I had several failed attempts, one involving interfacing which left me with a limp and floppy purse. I wanted one that had integrity, one that could stand up on its own!!
So I was in Five Below the other day (like a $5 and under dollar store) and saw a six-pack of takeout gift boxes. They weren't made of thick cardboard, more of a waxy, plastic cardboard that was thin and pliable. I decided to grab them and see what I could come up with.
Materials:
One chinese takeout container, preferably made of a waxy cardboard that can stand getting wet, yet is thin enough to sew through.
Two fat quarters, or two fabrics of your choice, approximately 18 inches square.
Thread, bobbin, pins, sewing machine.
Tutorial:
Step One:
Take apart the handle. Mine just had two knots, so I untied them and slipped them through the holes. The holes had metal eyelets lining them. Then pull apart the takeout container. You might have to gently rip apart any glued areas, and I had to pull the additional layers away from the eyelet and cut a small hole around them to release the other layers. I left the eyelets in place, and made sure to NOT rip the edges, and do not tear from the edge.
Step Two:
Lay your takeout container with the right side (outside) of the container laying against the wrong side of the fabric. Pin it to hold in place, note the small holes left from around the eyelets, and the container will want to fold inward, so pin it securely and make sure there is enough fabric underneath.
Step Three: Cut around the edge of the container. Leave about 1/2" seam allowance minimum. Do not worry about cutting out the intricate lips of the "envelope" apparatus on top...just roughly outline for now.
Step Four: If you are a pinner, you can fold over the excess and pin it, as you can see in the upper left corner of the photo. Or, you can iron it in place. I on the other hand am a wing-it kind of girl...so I just folded it over as I went along. Stitch as close to the edge of the container as you can, but keep it consistent so you have a nice seam showing. I did about 1/4" seam allowance. Stitch ALL the way around the container. Once again, don't worry about the envelopey-hook part, just stitch as much as you can and leave it for now.
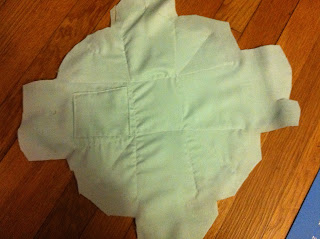
Step Five: You should now have something that looks like this:
Ok, so it sounds harder than it is. You are going to "stitch in the ditch" of all of the folds of the takeout container. Use a regular, straight stitch. I did a "00" 2.0 on my Brother machine. Stitch in EVERY fold. If you do it right, you should be able to start at one end, and go all the way across before you have to stop. Then cut the thread and go to the next side.
Step Six: You should now have something that looks like this:
Step Seven: Now, to do the liner you do the exact same process, but on the other side. I started out by cutting it out and then adding a pocket. I used pins to keep track of where the folds were. IMPORTANT: If you are adding a pocket you must sew it in before it is attached to the rest of the bag!
Step Eight: Fold under the entire edge of the lining and pin it. Now stitch along the same seam as the front, making sure you catch the lining.
HANDLE:
I didn't do a tutorial pic for the handle, so I will give written instructions:
First, I cut a 2" strip from the left over fat quarter. Length depends on how long you want your handle. I folded it in half, wrong-sides together and sewed it with a 1/4" seam allowance.
Then I turned it right side out.
Then I folded it inwards in thirds, so the two ends meet in the middle. I stitched each piece in place. You can also fold in half, use ribbon as a handle, or if your original container had a metal handle it can be beaded and reused. If you look closely at the picture, you can see the construction of the handle:
To put the whole thing together, follow the natural folds of the takeout container. I tucked the handle in between the two folds on the side. Use a strong thread to stitch through, and watch out for the holes in the original container, since they wouldn't be a strong point to attach! Here it is pinned. Notice, I finished over the "envelope hook" with an overcasting stitch, but I am considering alternatives, like ribbon or a binding.
Once you have it all sewn together, you are ready to add your keys and license and head out!


very nice...
ReplyDelete