Sunday, March 27, 2011

Drum...Lamp...Drumlamp?

So, a trash to treasure miracle:


So, my husband had purchased this kid's drum kit for $60 on craigslist.

Then he refinished them, using a technique he found on instructables.com. Then we had a house fire...and the drums SEEMED ok, but apparently all of the smoke and water damaged them. HE says they don't sound the same. His friend Bill concurs. I think they sound like drums...but apparently they were warped and now sound "out of tune."

So, as he is replacing his Toms, I said "WAIT! Can I have them? Do you think we could make one into a lamp?"

So, last night, we decided to get going on the project!!

First Step: Either buy a lamp kit, you can buy them at Walmart, some craft stores, or a hardware store. Or, in our case we had inherited two very ugly lamps. So, we pulled the lamp kit out of the urn that looks like a dead body should forever rest in it...and reused that.


I know, hideous right? It was FREE with the purchase of the bed and end tables my father in law recently bought. At an antiques warehouse/co-op you would all salivate over...He couldn't even keep this lamp or the other, equally hideous lamp in his room because they took up the whole end table!!


I apologize now for the poor quality for the photos. OF COURSE my Nikon battery was dead. Did my hubby tell me to charge it that morning? Yes. Did I? Of course not. I can't remember anything! So, iPhone it is!

Step Two: We set the lamp base aside, since we are going to upcycle that into something fun too(stay tuned)...waste not want not! Then we fed the lamp mechanism into an existing hole in the drum. Drum shells are full of holes, but you could always drill one if need be.


Step Three: Then my husband cut the threaded stem off of the pipe with my Dremel-knockoff tool (got it at Big Lots for $25 with all the attachments...if you don't have one check out Big Lots because it is AMAZING!) I was afraid of the sparks.


Pretty sparks...

Step Four: Here's the tricky part. We have a box of random screws and hardware in our house, and we just kept trying different configurations. We actually found a random metal tubey-thingie (real technical talk here) and used that. It fit in the drum hole perfectly...but you could use a piece of pvc, or a piece of pipe maybe? Then we screwed everything together.


Step Five: We had to glue the lamp mechanism in place, so it wouldn't topple over. We tried to use E6000 glue, but had to use hot glue as it wasn't holding and we are impatient. I used it like caulk to stabilize it.
Here is the inside of the drum, see the metal circle we used to hold everything together:

So far it should look like this (taken with Nikon since battery has partially charged;)


Step Six: Actually, in terms of the lamp it is pretty much done. If you had to cut the cord off, then reattach it with electrical tape and plug it in. However, then we moved on to the shade debacle. It is not pictured in the final product, because it is not done yet. Here's where I need help: Ideas?? How do I finish this?

6a: We drilled the bottom of six drumsticks.

6b: Then screwed them into a spare drum rim:


6c: Then wired them across the old lampshade top ring, also used a little help from our friend the hot glue gun...

6d: Then I TRIED to cut the old lampshade apart and make a new lampshade out of a hard rock cafe shirt...didn't work out...so In order to finish I need ideas. I was thinking of some sort of weaving? Not sure if it will work. HELP ME.
So for now:

However, the "face" of this project will probably change, since Tony wants to make the drum head into a clock...so then it will be a "clocklampdrum"

Enjoy:)

I did put this in audition for one month to win it...maybe if I get in the competition I will get back on the crafting wagon (in all fairness, first I was sick, then GRADES WERE DUE!!)


One Month To Win It

Saturday, March 26, 2011

A few of my favorite things...

Well, I didn't get chosen for "One Month to Win it." I am actually semi-relieved, since after I auditioned I thought, "and when am I going to have time to do this?" However, I would've found time, and I will try again in April. Besides, who can compete with the Tree Bookshelves made by "Girl in Air?"....I mean, really. Check them out and you will see why I didn't make it! Besides, I am a newbie at this whole thing, and Girl in Air won American Crafter! I'm planning on putting one of these up in my house, but I want to find a halved railiroad tie or something to make a rounded trunk...

I need a good idea, for my next two auditions...since in September I have the chance to be a hopeful on "So You think You're Crafty." That, I have better odds at...there will only be 15 of us, rather than 99.

Go to www.soyouthinkyourecrafty.com to check out the current competition. Season 7 starts Monday, I'm on for Season 9...sigh...long ways away!

I need an amazing audition piece for that...still brainstorming.

Some of the other cool things I have found on the blogosphere lately:

Christina @ The Tattered Tag

She was my first follower....and makes amazing country-style gifts. I mean, things you would pay top dollar for at that stupid country store in the mall...but her stuff is NOT made in China!

The next project I want to embark on is making curtains for my bathroom. I saw these, made by Corduroy's Closet
AND HAVE TO MAKE THEM!! I am going with a bathroom theme, so they will be a bit different. Can you believe she got voted off of So You Think You're Crafty? I can't, because if she had a chance to submit these...she might have won that week!

Amazing, right?

Personally, I am in a crafting funk. An all-around funk. I am not sure why, but think that I need to get moving on a project to make me feel better!!

Another project idea I have, was inspired by a plethora of sources....but www.bystephanielynn.com is one of my favorite places for inspiration. Her photography is beautiful. Her projects are impeccable. Here is a wreath made from BOOKS!

So, while I sit here and ponder how much housework I have...I actually must get moving on that!! As soon as I get my own tutorial up, I will let y'all know...but for now MUST CLEAN HOUSE

Sunday, March 20, 2011

New spin on an old wine bottle

Ok, so I saw these "green lanterns" at a craft fair and I have been DYING to make one since. They are awesome, and they are beautiful, and if you have the supplies...they are free.

Before my ADD kicks in...here is what I made:


So I had been researching how to cut the bottles, since that is obviously the most difficult part. There were so many different conflicting tips, and then I saw....

At AC Moore. Price tag: $34.99. Being frugal (ahem, broke) I decided to wait until I got another fifty percent off coupon. Then I got one on Friday that was good for today ONLY. So I went in today, grabbed the box, and headed for the counter. I hand the girl the coupon. She says, "You can't use this." I say, "WHY?" She says, "It's on clearance, that will be $5.31." WOOOHHOOO

Then I think...it must not work that well if they are giving them away.


Yes, pieces. I get frustrated, so I head to my husband. HE says..."Where are the screws?"

What screws? Oh, the screws I dropped in the bag in the car without a second glance because I was so excited to see what was in the box.
OOPSIE!


SO, after we tried it on three beer bottles, I decided to try it on a wine bottle. Did I mention that the beer bottle cutting was unsuccessful? Ok, so I had to modify the directions in order to make sure it worked. I drew inspiration from other people that I had read previous to seeing this device.

First step: Use either a glass scoring wheel or this lovely device to score the bottle. Note: this device at least gives you a straight, consistent line. I tried the regular glass wheel before (they are only three dollars) and I was all over the place. I, for the record, had not had the wine from the bottle prior to cutting.


Second Step: After scoring, set up a deep enough bucket of ice water. Then, heat the scored line over a candle until it is hot. Dunk it in the ice water. If you don't hear a cracking noise, dry the bottle off and heat it up again. Repeat the dunking. It should crack away.

This is not mentioned in the directions with the kit...they give you a "tapping rod" which gave me the urge to smash the bottle off of the front steps...


Third Step:
Sand the edges. I opted to not cut the bottom off, because I was afraid the project would become shards...as had my previous attempts with the beer bottles. I used my rotary tool to sand, and also used 100 grit sandpaper.


Fifth step: You can paint, decoupage or...of course...I choose the more difficult, never done by me before option. I etch. I choose a stencil that is supposed to be used with the sand blasting glass etching kit at AC MOORE (very BIG pricetag) and decide to try my hand at using the rotary tool. So I put (I mean my husband put) the grinding stone attachment on. I duck taped (pretty purple) on the stencil. NOTE: Your stencil will never be the same...so don't use one you ever want to see again.

Sixth Step: I had at it with the grinding stone. I tried to avoid blowing out the plastic, and just "wung it." Overall, I think it looks rather nice. However, look at the poor stencil. RIP sunflower stencil I bought for 10 cents...

Seventh Step: Wait, you are done!! Just add a candle and enjoy!! I'm warning you...bottle cutter is currently my enemy and I would've returned it if it had been more than $5. I know, like everything, I will get better at this. I am pretty happy with my first shot!!


Check out the wonderful "neighborly" writeup by Christina at The Tattered Tag.
She was my first follower...and she has become a great blog friend:)

Thursday, March 17, 2011

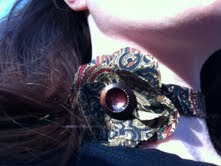
Quickie Choker

So, I love fabric flowers because you can make them from any scraps, they are easy, and they are fun to coordinate with any outfits. I was bored a few days ago, and feeling crafty. I decided to make myself a little necklace/choker deal!

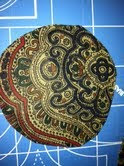
First step: Choose your fabric, and cut a two inch wide strip. I made my strip about a yard long, but you can definitely make it as long or short as you'd like...just make sure you can tie it around your neck!!

Step Two: Cut three inch squares from the fabric. I cut more than enough, but used only four.

Step Three: Sew your strip of fabric together, right sides together. Also sew across one end, so you can easily turn it right-side out. After you turn it out, it will look like this:

Step Four:
Cut the squares into circle shapes.

Step Five:
Slit the sides of the circle to make petals, just like I have shown you before:
I did six petals on the bottom three, four on the top.

Step Six: Stack and stagger the circles, and sew them together.

Step Seven: Fold in half and stitch again to give some dimension.

Step Eight: Make sure your petals are shaped, and sew the flower to the "ribbon" you made.

Step Nine: Add a button center, and tie it on. Voila! Would be great to make for bridesmaids out of leftover hem fabric! Would also make a neat wristlet.

Monday, March 14, 2011

Decorative Photo Tiles

Well, if you go to CVS, Winkflash, Snapfish, etc, you can have your child's face put on a coaster or a photo tile. Why waste your money when you can make your own? The only things you need are easily found in a crafty home for free, except maybe the tiles. However, I found them in my home or you could ask friends or try freecycle.org.

So, you will need the following:

REAL photographs. They can't be printed off of your computer...sorry

Aleene's tacky glue

Mod Podge

Ceramic Tiles (you can also use wood and other surfaces as your background)

Paintbrushes

Step One: Glue the photos on the tile using a hearty coating of tacky glue. Let it dry for awhile, at least 4 hours. Apply weight if necessary.


Step Two: After glue has dried, apply a coat of mod podge. Allow this to dry completely (once again, we are talking hours). This is what I call an "in between" project. I work on it for a minute, and while it's drying I do something else.


Step Three: Keep applying more coats of Mod Podge and letting it dry. If you want to add texture, do some canvas looking swirls with your brush. After the first coat it will hold the pattern.


OPTIONAL: If you want to reduce tackiness/use as a drink coaster, apply a few coats of clear gloss. I skipped this step because it is winter time, and that stuff smells. P-U! I will probably lacquer them in the warmer months. For now, they can hang out on my shelf!